Friday, October 15, 2010
Thursday, October 7, 2010
Generate Java Class from XSD
XSD stands for XML Schema Defination. This is the alternative of old DTD.
An XML Schema can:
•defines elements that can appear in a document
•defines attributes that can appear in a document
•defines which elements are child elements
•defines the order of child elements
•defines the number of child elements
•defines whether an element is empty or can include text
•defines data types for elements and attributes
•defines default and fixed values for elements and attributes
XSD will be used in most of the Web Applications instead of DTD for the following reasions:
•XML Schemas are extensible to future additions
•XML Schemas are richer and more powerful than DTDs
•XML Schemas are written in XML
•XML Schemas support data types
•XML Schemas support namespaces
Simple Structure of XSD:
File name is schema.xsd.
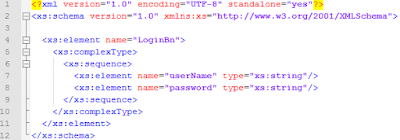
There are number of ways/tools that will generate java class from XSD. One of them is xjc given by Sun Java Web Service Developers Pack.
This is the command line tool.
To generate the java class enter the statement in command prompt.
C:\xjc schema.xsd -d .
This command generates:
package generated;
import javax.xml.bind.annotation.XmlAccessType;
import javax.xml.bind.annotation.XmlAccessorType;
import javax.xml.bind.annotation.XmlElement;
import javax.xml.bind.annotation.XmlRootElement;
import javax.xml.bind.annotation.XmlType;
/**
*Java class for anonymous complex type.
*
*The following schema fragment specifies the expected content contained within this class.
*
*
* <complexType>
* <complexContent>
* <restriction base="{http://www.w3.org/2001/XMLSchema}anyType">
* <sequence>
* <element name="userName" type="{http://www.w3.org/2001/XMLSchema}string"/>
* <element name="password" type="{http://www.w3.org/2001/XMLSchema}string"/>
* </sequence>
* </restriction>
* </complexContent>
* </complexType>
*
*
*
*/
@XmlAccessorType(XmlAccessType.FIELD)
@XmlType(name = "", propOrder = {
"userName",
"password"
})
@XmlRootElement(name = "LoginBn")
public class LoginBn {
@XmlElement(required = true)
protected String userName;
@XmlElement(required = true)
protected String password;
/**
* Gets the value of the userName property.
*
* @return
* possible object is
* {@link String }
*
*/
public String getUserName() {
return userName;
}
/**
* Sets the value of the userName property.
*
* @param value
* allowed object is
* {@link String }
*
*/
public void setUserName(String value) {
this.userName = value;
}
/**
* Gets the value of the password property.
*
* @return
* possible object is
* {@link String }
*
*/
public String getPassword() {
return password;
}
/**
* Sets the value of the password property.
*
* @param value
* allowed object is
* {@link String }
*
*/
public void setPassword(String value) {
this.password = value;
}
}
Wednesday, April 21, 2010
Configure Log4J for Hibernate
Sometime, you see that hibernate application starts with a warning message
log4j:WARN No appenders could be found for logger (<Class Name>).
log4j:WARN Please initialize the log4j system properly.
this is due to your hibernate application don't have log4j setup.
Create a file named log4j.properties in the root directory and add the following lines:
### shows logs to standard output ###
log4j.appender.stdout=org.apache.log4j.ConsoleAppender
log4j.appender.stdout.Target=System.out
log4j.appender.stdout.layout=org.apache.log4j.PatternLayout
log4j.appender.stdout.layout.ConversionPattern=%d{ABSOLUTE} %5p %c{1}:%L - %m%n
### set log levels - for more verbose logging change 'info' to 'debug' ###
log4j.rootLogger=debug, stdout
log4j.logger.org.hibernate=info
#log4j.logger.org.hibernate=debug
### log HQL query parser activity
#log4j.logger.org.hibernate.hql.ast.AST=debug
### log just the SQL
log4j.logger.org.hibernate.SQL=debug
### log JDBC bind parameters ###
log4j.logger.org.hibernate.type=info
### log cache activity ###
log4j.logger.org.hibernate.cache=info
### enable the following line if you want to track down connection ###
### leakages when using DriverManagerConnectionProvider ###
log4j.logger.org.hibernate.connection.DriverManagerConnectionProvider=trace
Friday, April 16, 2010
Run Hibernate without hibernate.cfg.xml file
This is very uncommon speak, run hibernate without hibernate.cfg.xml file?. but it happens in some cases, there is no hard-and-fast rule that you have to have hibernate.cfg.xml file. Yes! Hibernate allows you to do that.
Suppose you want to connect multiple database at runtime, but one database connection at a given point of time. Here may be database driver will be different, database url will be different or user name and password will be different. In this case you have to pass all those configurations to the Hibernate, but question is HOW?
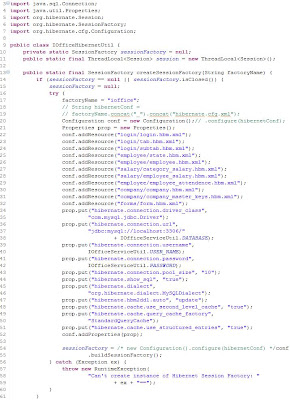
There is a Class named "Configuration" in "org.hibernate.cfg" package. We can use this class to pass dynamic parameters to the Hibernate environment. This is not the case that "Configuration" class is used for passing dynamic parameters to the Hibernate.
In both cases "Configuration" class is used, bi default, hibernate is searched for file name like "hibernate.cfg.xml", read the content and load the parameters to the object of "Configuration" class and use those in hibernate environment.
In our case we don't have "hibernate.cfg.xml" file.
So, you have to write code for loading parameter to the Hibernate environment.
below the small code snippet for that:
Suppose you want to connect multiple database at runtime, but one database connection at a given point of time. Here may be database driver will be different, database url will be different or user name and password will be different. In this case you have to pass all those configurations to the Hibernate, but question is HOW?
There is a Class named "Configuration" in "org.hibernate.cfg" package. We can use this class to pass dynamic parameters to the Hibernate environment. This is not the case that "Configuration" class is used for passing dynamic parameters to the Hibernate.
In both cases "Configuration" class is used, bi default, hibernate is searched for file name like "hibernate.cfg.xml", read the content and load the parameters to the object of "Configuration" class and use those in hibernate environment.
In our case we don't have "hibernate.cfg.xml" file.
So, you have to write code for loading parameter to the Hibernate environment.
below the small code snippet for that:

How to Run Hibernate
There are couple of jars that are needed to run the Hibernate Applications. Some jars from third party and some are from JBoss community.
Jars:
• antlr.jar
• backport-util-concurrent.jar
• hibernate-commons-annotations.jar
• hibernate-annotations.jar
• hibernate-ehcache.jar
• log4j.jar
• slf4j-log4j12.jar
• slf4j-api.jar
• javassist.jar
• commons-collections.jar
• dom4j.jar
• lucene-core.jar
• commons-logging.jar
• hibernate-search.jar
• jta.jar
• hibernate-core.jar
• ehcache.jar
• xml-apis.jar
those mentioned jars can be download from respective sites or from
Jar Finder
To create Hybernate Application,
Step1 : You need to add all those jars into your application class path.
Step2 : Create hibernate configuration file (hibernate.cfg.xml).
file will contain hibernate runtime properties of Session factory eg. "driver-class" ,"database-url", "user","password" etc. and hibernate mapping resources.
eg.
<?xml version='1.0' encoding='utf-8'?>
<!DOCTYPE hibernate-configuration PUBLIC
"-//Hibernate/Hibernate Configuration DTD//EN"
"http://hibernate.sourceforge.net/hibernate-configuration-3.0.dtd">
<hibernate-configuration>
<session-factory>
<property name="hibernate.connection.driver_class">
com.mysql.jdbc.Driver
</property>
<property name="hibernate.connection.url">
jdbc:mysql://localhost:3306/ioffice
</property>
<property name="hibernate.connection.username">root</property>
<property name="hibernate.connection.password"></property>
<property name="hibernate.connection.pool_size">10</property>
<property name="show_sql">true</property>
<property name="dialect">org.hibernate.dialect.MySQLDialect</property>
<property name="hibernate.hbm2ddl.auto">update</property>
<!-- Mapping files -->
<mapping resource="contact.hbm.xml" />
</session-factory>
</hibernate-configuration>
Step3 : Create mapping file like <class-name>.hbm.xml, the content will be like:
eg.
<?xml version="1.0"?>
<!DOCTYPE hibernate-mapping PUBLIC
"-//Hibernate/Hibernate Mapping DTD 3.0//EN"
"http://hibernate.sourceforge.net/hibernate-mapping-3.0.dtd">
<hibernate-mapping>
<class name="Contact" table="CONTACT">
<id name="id" type="long" column="ID" >
<generator class="assigned"/>
</id>
<property name="firstName">
<column name="FIRSTNAME" />
</property>
<property name="lastName">
<column name="LASTNAME"/>
</property>
<property name="email">
<column name="EMAIL"/>
</property>
</class>
</hibernate-mapping>
Step4 : Create a class named "Contact.java"
public class Contact {
private String firstName;
private String lastName;
private String email;
private long id;
public String getEmail() {
return email;
}
public String getFirstName() {
return firstName;
}
public String getLastName() {
return lastName;
}
public void setEmail(String string) {
email = string;
}
public void setFirstName(String string) {
firstName = string;
}
public void setLastName(String string) {
lastName = string;
}
public long getId() {
return id;
}
public void setId(long l) {
id = l;
}
@Override
public String toString() {
return this.id + ", " + this.firstName + ", " + this.lastName
+ ", " + this.email;
}
}
Step5: Use
import org.hibernate.Session;
import org.hibernate.SessionFactory;
import org.hibernate.Transaction;
import org.hibernate.cfg.Configuration;
public class FirstExample {
private SessionFactory sessionFactory = null;
public FirstExample() {
sessionFactory = new Configuration().configure().buildSessionFactory();
}
public SessionFactory getSessionFactory() {
return sessionFactory;
}
public void setSessionFactory(SessionFactory sessionFactory) {
this.sessionFactory = sessionFactory;
}
public void save(Contact contact)
{
Session session = null;
try {
session = this.getSessionFactory().openSession();
Transaction tr = session.beginTransaction();
System.out.println("Inserting Record");
session.save(contact);
tr.commit();
System.out.println("Done");
}
catch (Exception e) {
System.out.println(e.getMessage());
} finally {
session.flush();
session.close();
}
}
public void delete(Contact contact)
{
Session session = null;
try {
session = this.getSessionFactory().openSession();
Transaction tr = session.beginTransaction();
System.out.println("Deleting Record.");
session.delete(contact);
tr.commit();
System.out.println("Done");
}
catch (Exception e) {
System.out.println(e.getMessage());
} finally {
session.flush();
session.close();
}
}
public void update(Long key, Contact contact)
{
Session session = null;
try {
session = this.getSessionFactory().openSession();
Transaction tr = session.beginTransaction();
System.out.println("Updating Record.");
Contact cntct = (Contact) session.get(Contact.class, key);
cntct = contact;
session.update(cntct);
tr.commit();
System.out.println("Done");
}
catch (Exception e) {
System.out.println(e.getMessage());
} finally {
session.flush();
session.close();
}
}
public Contact fetch(Long key)
{
Session session = null;
Contact contact = null;
try {
session = this.getSessionFactory().openSession();
System.out.println("Query Record.");
contact = (Contact) session.get(Contact.class, key);
System.out.println("Done");
}
catch (Exception e) {
System.out.println(e.getMessage());
} finally {
session.flush();
session.close();
}
return contact;
}
public static void main(String[] args) {
FirstExample fEx = new FirstExample();
Contact cont = fEx.fetch(new Long(4));
System.out.println(cont);
}
}
Thursday, February 11, 2010
Use of "immediate" property in JSF
"immediate" attribute is available in almost all user input JSF tags. This attribute is commonly called "Event Handling Attribute". The valid values for this attribute is either "true" or "false". If value of this property is set to "true", then the validation, conversion, and events associated with these components takes place in this phase instead of the Process Validation Phase.
Eg. Suppose you have a cancel button that ignores all form values then we used this attribute.
Eg. Suppose you have a cancel button that ignores all form values then we used this attribute.

Multiple faces-config.xml for JSF Application
We can use multiple faces-config.xml for JSF application, for that you have to specify file names for the JSF application in web configuration file(web.xml).
There is a built-in parameter of JSF named "javax.faces.CONFIG_FILES" we can use this paramete for JSF configuration files. This parameter can take any no. of files.
Add the following entry in web.xml file.
<context-param>
<param-name>javax.faces.CONFIG_FILES</param-name>
<param-value>
/WEB-INF/faces-config1.xml,
/WEB-INF/faces-config2.xml,
/WEB-INF/faces-config3.xml
</param-value>
</context-param>
Difference between JSP-EL and JSF-EL
JSP-EL:
1. JSP-EL value expressions are delimited by ${..}.
2. The ${..} delimiter immediately evaluate the given expression, at the time when the page is processed.
JSF-EL:
1. JSF-EL value expressions are delimited by #{..).
2. The #{..) delimiter is deferred evaluation. With deferred evaluation ,the expression is evaluates whenever a value is needed.
Difference between Managed and Backing Beans in JSF
Managed Beans: Java Bean Objects managed by JSF implementation is called Managed Bean, It is nothing but describe how beans are created and managed(scope). Managed Beans are automatically created by the framework at runtime. Managed Beans can be put in request, session and Application context.
Backing Beans: Java Beans Objects that associated with UI component is called backing bean. It is basically holds data of associated UI component and may contains business logic. The backing beans may also contains other methods for validations and events for that UI component. The Backing Beans are referenced by form(JSF/JSP page). The Backing Beans can be put in request scope only.
Sometime Backing Beans is also called View Objects, View Objects are specifically used in Presentation Layer. It contains data and logic to validate, events and interact with business logic tier.
Wednesday, February 10, 2010
How to Declare Message Bundle in JSF
There are two ways to declare Message Bundle in JSF:
1. Simply configured in faces-config.xml file.
<application>
<resource-bundle>
<base-name>wiki.com.messages</base-name>
<var>message</var>
</resource-bundle>
</application>
2. Use built-in JSF tag to declare Message Bundle. this should be for each and every jsf page. If same message is used for multiple pages then this should not be a good choice.
<f:loadBundle baseName = "wiki.com.messages" var="message"/>
Wednesday, January 20, 2010
Perform Length Validation on Text Field Component.
Bellow code snippet validate minimum and maximum length of a Input Text Field:
<h:inputText id="empName" value="#{employeeBean.name}"
size="25" minlength="5" maxlength="255"/>
<h:message
style="color: red;
font-family: ’New Century Schoolbook’, serif;
font-style: oblique;
text-decoration: overline" id="errors1" for="empName"/>
<h:inputText id="empName" value="#{employeeBean.name}"
size="25" minlength="5" maxlength="255"/>
<h:message
style="color: red;
font-family: ’New Century Schoolbook’, serif;
font-style: oblique;
text-decoration: overline" id="errors1" for="empName"/>
Using Implicit Objects in Component Value
Using Implicit object in JSF is same as Implicit object of JSP. but one thing is that, how to use those objects in component value. Bellow is a small code snippet for that:
<h:outputFormat title="thanks" value="#{bundle.ThankYouParam}">
<f:param value="#{sessionScope.name}"/>
</h:outputFormat>
This tag gets the name of the customer from the session scope and inserts it into the parameterized message at the key ThankYouParam from the resource bundle. For example, if the name of the customer is Prabir Karmakar, this tag will render:
Thank you, Prabir Karmakar.

Thursday, January 7, 2010
Elements of Navigation Rules in JSF
A navigation rule(facess-config.xml) of JSF consists of the following elements:
•<navigation-rule>*: The wrapper element for the navigation cases.
•<from-view-id>*: Contains either the complete page identifier (the context sensitive relative path to the page) or a page identifier prefix ending with the asterisk (*) wildcard character. If you use the wildcard character, the rule applies to all pages that match the wildcard pattern. To make a global rule that applies to all pages like Help Page, leave this element blank.
•<navigation-case>*: The wrapper element for each case in the navigation rule. Each case defines the different navigation paths from the same page.
•<from-action>: An optional element that limits the application of the rule only to outcomes from the specified action method. The action method is specified as an EL binding expression.
•<from-outcome>*: Contains an outcome value that is matched against values specified in the action attribute of UI components. Later you will see how the outcome value is referenced in a UI component either explicitly or dynamically through an action method return.
•<to-view-id>*: Contains the complete page identifier of the page to which the navigation is routed when the rule is implemented.
•<redirect/>: An optional element that indicates that the new view is to be requested through a redirect response instead of being rendering as the response to the current request. This element requires no value.
NOTE : * marked are mandatory elements
Monday, January 4, 2010
Export config Data Using Preferences Class
We can Export User/System configuration data using Preferences API to a persistent file. The exported file would be XML formated.
Example:

The content of the XML file would be:

Example:

The content of the XML file would be:

Java Properties Class Vs Preferences Class
Whenever we needed to store user specific configuration, we could use the Properties class. One issue using Properties class is where to store those files, here simple file system or network files would be used to store those informations, but what happens if user does not have write permission on those file systems.
Here the Preferences API comes into the existence, this API is available since Java 1.4, this API resolves these problems. The purpose of the API is to allow for the easy storage of user preferences without the developer having to worry about where this information will be stored. The API determines the appropriate place.
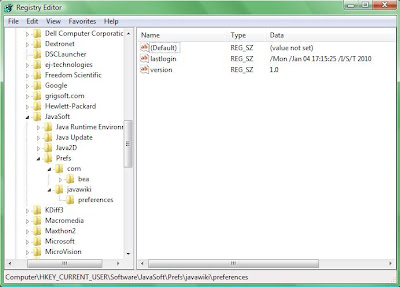
For example, when running an application in Windows, the preferences will be stored in the Windows registry.
This API is found in java.util.prefs package. All preferences are stored like tree-structure with the data itself stored in nodes of the tree.
This API provides two types of Preferences data:
1. User Preferences
2. System Preferences
1. User Preferences are only visible to the user, for which it is created.
2. System Preferences are shared among all the users.
The Preferences class has several methods used to get and put primitive data in the Preferences data store. We can use only the following types of data:
* String
* boolean
* double
* float
* int
* long
* byte array
Example:
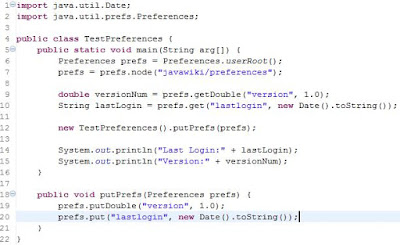
Output:

If we use Preferences API in Windows platform, then Preference data will be stored in Windows Registry.
Here the Preferences API comes into the existence, this API is available since Java 1.4, this API resolves these problems. The purpose of the API is to allow for the easy storage of user preferences without the developer having to worry about where this information will be stored. The API determines the appropriate place.
For example, when running an application in Windows, the preferences will be stored in the Windows registry.
This API is found in java.util.prefs package. All preferences are stored like tree-structure with the data itself stored in nodes of the tree.
This API provides two types of Preferences data:
1. User Preferences
2. System Preferences
1. User Preferences are only visible to the user, for which it is created.
2. System Preferences are shared among all the users.
The Preferences class has several methods used to get and put primitive data in the Preferences data store. We can use only the following types of data:
* String
* boolean
* double
* float
* int
* long
* byte array
Example:

Output:

If we use Preferences API in Windows platform, then Preference data will be stored in Windows Registry.

Subscribe to:
Comments (Atom)